Limited Time: $489 Off LR All Access – Pro
Limited Time: $489 Off LR All Access – Pro
How to Make Your Digital Photo Look Like Film
4 min read
The Retro Film Look
Whether you use a DSLR or a mobile phone, you can take a nearly perfect digital photo without much effort. Auto-focus, auto-white balance, auto-iris, auto-everything. And because it is digital, you can take hundreds of shots until you get the right one. It has never been easier to take perfect photos and sometimes that can be… boring. One option to bring some life and energy back into your photos is to go old-school with the retro film look. So, How to Get the Film Look with Any Camera in Lightroom?

Once upon a time…
In the distant past, people didn’t have digital cameras. Instead, they had cameras which shot on a light-sensitive substance known as “film.” To take a photo on film, you had to manipulate several settings on your camera such as exposure, focus, f-stop, and white balance – all things your phone does automatically. On top of that, you had to choose the correct film stock for the lighting conditions you were shooting under. To make things more difficult, you would have no idea if you even succeeded until days later when you finished developing the photos in a lab. Yeah, it was hard.

The beauty of film
However, with all that difficulty came a unique beauty in the photos the process created. Each photo was a unique creation, not one of thousands lost inside a hard drive. First of all, film has grain, which are the actual light sensitive crystals set onto the film. This is not like the ugly noise that shows up when your DSLR is on the wrong ISO setting in a dark room. No, film grain has a stunning texture that gives each photo a raw, organic quality that is impossible to capture with a digital camera. Film also produced other happy accidents in color and lighting that were dependent on the film stock used, all of which are lost with modern equipment.
The alternative
Not all is lost. While the days of film are surely behind us, there is a growing trend in at least trying to recapture the look of film within our modern digital world. However, this is a complicated image-editing task for a novice. Luckily, there are shortcuts out there that can do most of the work for you, such as our +Cine FilmX Presets and Actions collection for Photoshop and Lightroom. The pack includes different film stock emulator presets as well as glow actions. But it’s not as easy as just slapping some presets over any old photo. There are steps you can take to make sure your results match your vision.
Shoot raw
Or at least as flat as you can. Remember, since you already know you are going to process this photo for a specific look in post, you need to focus on collecting the best raw data possible. This means capturing as much color and dynamic range data as you can. You want to be sure you have all the detail you can get in both the shadows and highlights. This gives you the most information possible and the best chance of getting the results you want in post.
Time to edit
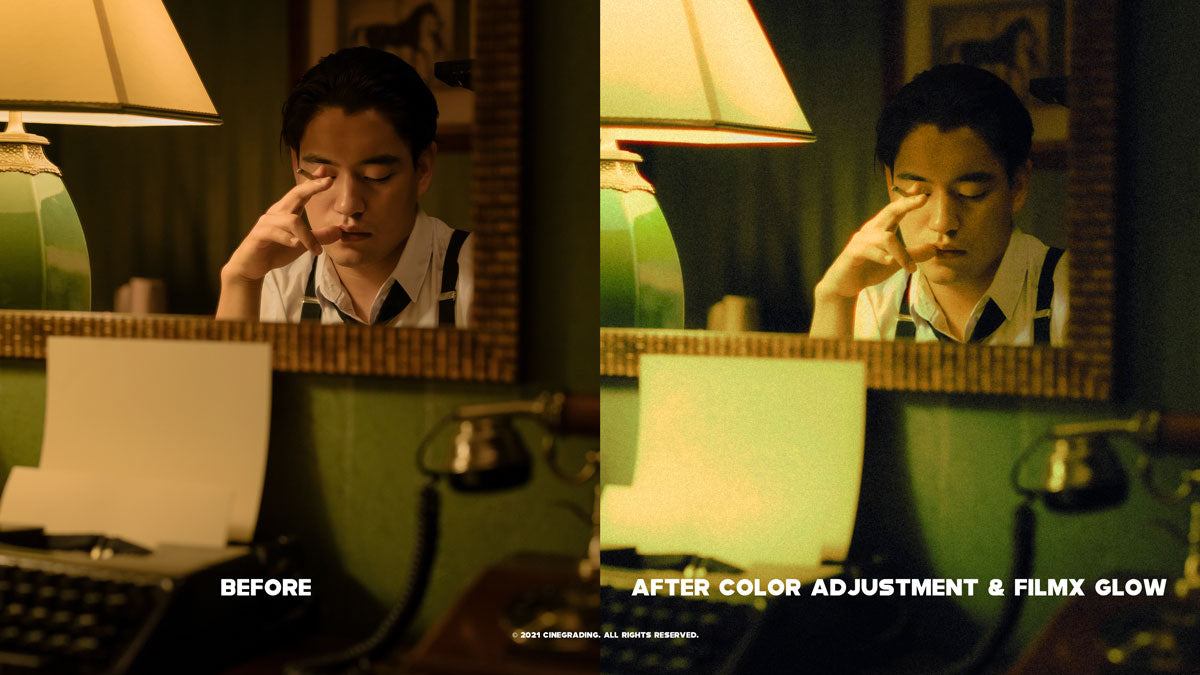
Now, open up your favorite photo editing software and start making some adjustments. Some of the key things to remember with the film look is that shadows are not 100% black and highlights are not 100% white. That kind of dynamic range is only possible in a digital color space. In reality (i.e., with film), dynamic range is smaller. So, lift your blacks a little and drop your whites. Also, photos taken on film were slightly less sharp than what you can achieve with digital, so you’re going to want to reduce clarity slightly using the presence adjustment. You will also have to adjust the grain adjustment as well, which helps achieve the organic grittiness of real film. Play around with different setting to get the look you want. You will also need to adjust color, tint, tone curve, and temperature, as every film stock has a unique color profile. Finally, you can add effects such as lens flares, light leaks, and glow; the happy accidents so common in film-based photography.

Presets to the rescue
Now, if you find the prospect of manually adjusting your photos to achieve a retro film look daunting, you can save a lot of time by simply using our +Cine FilmX pack. It’s already set up to take your raw image and do all the hard work of making it look like it was taken with any number of film stocks. Color and tone adjustments are made automatically. Grain is added as well. You can still adjust the tint, color temperature, tone, etc. if the preset doesn’t create exactly the look you want. The +Cine FilmX preset collection includes looks inspired by Cinestill & Kodak film stocks.

Take action
After you have found the film stock preset that matches the look you want, you can apply actions to further achieve the look and feel you are going for. In our +Cine FilmX pack, these include red glow, green glow, and cyan glow, all of which play with the highlight in the image to achieve the mood and tone you want. This was a common feature with CineStill film stocks, so you want to try it out to get your most authentic retro film look.
Keep the past alive
Digital photography is a great thing. It has made photography available to more people than ever before, and since we don’t have to buy film, it is cheaper than ever as well. However, there is a certain beauty that has been lost since we left film behind, a raw, organic quality that perfectly sterile digital images simply cannot match. So next time you are feeling bored with digital perfection, take your shots into the past with a retro film look. Hope you enjoy reading How to Make Your Digital Photo Look Like Film!
